Policy-Based Management

Traditionally, SQL Server instances have been treated as "islands", each one configured and managed separately. For example, if you have 25 SQL Server instances to manage:
- Ten instances might be using Windows Authentication and the other 15 are using Mixed Authentication.
- Database Auto Shrink might be turned on for five instances and turned off for the rest.
- SQLMail might be enabled for 15 instances, Database Mail might be enabled for five instances, and the rest may not have mail enabled.
- Each database may have its own object naming standard, depending upon who designed the database.
These sorts of inconsistencies (and the list could go on) can be maddening for DBAs who have to "manage" separate instances differently. To make their lives easier, many DBAs try to develop and enforce common, enterprise-wide standards for the SQL Server instances they manage, as they recognize the benefits of standardization. The difficulty has been that even if policies are developed, there has been no easy way to enforce them (unless the DBA is fortunate enough to be the only one ever touching an instance), other than manually checking each instance for compliance on a regular basis, and what DBA has time to do this?
New to SQL Server 2008 is Policy-Based Management , an innovative feature that can help DBAs define and enforce policies (standards) for the SQL Server instances throughout their organization. It is available in both the Standard and Enterprise Editions of SQL Server 2008. While it may not offer DBA nirvana, it is a great first step toward more efficient enterprise-wide SQL Server management.
What Policy-Based Management Does
Essentially, this is what Policy-Based Management offers DBAs:
- The Ability to Define Standard Policies
Defining policies allows the DBA to proactively choose how SQL Server instances, databases, and objects are configured. These policies allow the senior DBA (or whoever else is responsible for internal standards) to establish standards that others have to follow when they interact with the organization's SQL Servers, ensuring that consistency is maintained. The DBA can choose to create as few or as many policies as are needed to accomplish the required level of consistency.
- The Ability to Selectively Enforce Policies
Once policies have been defined, the DBA can choose on which instances, database, or database objects to enforce the policies. Policy-based management is very granular, allowing the DBA to create policies that meet special circumstances. For example, if the DBA needs to exempt a particular instance, database, or database object from a policy, this is no problem.
- The Ability to Automate Policy Checking and Enforcement
Once a policy has been defined and then assigned at the correct level (instance, database, or object), the DBA has several different ways to enforce compliance with the designated policies. For example, he may decide that he only wants to know about out-of-compliance policies. In other cases, he may want to prevent out-of-compliance policies from occurring in the first place. We will learn more about enforcement options a little later in this chapter
- The Ability to Fix Out of Policy Conditions with the Click of a Button
In some cases, if you find that a policy is out of compliance, you can click a button and force the out-of-policy condition to be fixed. For example, if you use Policy-Based Management to determine if all of your databases have Auto Update Statistics on, and you find that some databases have this option turned off, with the click of a button, you can turn Auto Update Statistics on for all of the databases out of compliance with your policy. This has the potential of being a great time saver.
Now that we know a little about Policy-Based Management , let's learn some more about the kinds of policies that you can create.
How You Might Use Policy-Based Management
After you install SQL Server 2008, there are no policies created for you. That's because, as the DBA, it is our job to decide what policies we want to create and enforce for our SQL Servers. Fortunately, Microsoft has not left us completely out in the cold. Although hidden, Microsoft has included a number of sample policies, stored as XML files in our SQL Server installation, which we can review and learn from. If we like them, we can choose to import them into our SQL Server instances and put them to work. In addition, we can use the policies as examples on which to model our own policies. In any event, it is valuable to review the included policies so we can better appreciate what Policy-based Management has to offer.
These policies are hidden away in this folder in your SQL Server installation:
Drive_letter:\Program Files\Microsoft SQL Server\100\Tools\Policies\DatabaseEngine\1033
You can import these sample policies (you can delete them later if you don't want to use them) from SSMS by navigating to Management, opening up Policy-Based Management , right-clicking on "Policies", then selecting "Import Policy". At this point, select all the policies in the folder described above, and click "OK". Some of the available policies are shown in Figure 1:
Figure 1: This is a partial list of the sample policies that can have been included with the SQL Server 2008 installation.
The first thing you should notice when you look at this list is that you can create categories of policies to make them easier to manage Within each category are one or more policies that the DBA can choose to enforce on their SQL Server instances. For example, you can create policies to enforce:
· "Database Page Verification" on databases
· "Database Auto Close" is turned on or off for your database
· "SQL Server Password Policy" for your SQL Server instances.
Of course, this list is not exhaustive. DBAs can also include in their policies checks of collation, or for use of full recovery model without transaction log backups, and many other "safety catches" that could save them a lot o trouble further down the line.
The aim of Policy-Based Management is to make it easy for the DBA to formulate most any policy required for their SQL Servers, then to enforce this standard as deemed necessary.
How Policy-Based Management Works
Up until this point, I have used the term "policy" interchangeably with "Policy-based Management" to keep things simple. In this section, we will take a more detailed look at how Policy-Based Management works. In fact, Policy-Based Management includes four major steps, each of which you need to understand before you implement it on your SQL Servers:
- Selecting Facets : Before you create a policy, the first step is to select a Policy-Based Management facet and configure its properties. A facet is a collection of pre-defined properties that describe some functionality of SQL Server. For example, some common facets are Audit, Database Maintenance, Database Options, Database Performance, Server, and Stored Procedure. There are a total of 74 facets available in SQL Server 2008. Each of these facets has one or more properties. For example, the Database Options facet has 45 different properties. Some of them include AutoClose, AutoShrink, AutoUpdateStatisticsEnabled, and PageVerify. When it really comes down to it, think of a facet (and its properties) as something inside of SQL Server that is configurable. Facets and properties are all predefined by SQL Server 2008.
- Setting Conditions. Once you have selected a property of a facet that you want to create a policy for, the next step is to create a property condition that specifies what state you want the property of the facet to have. In other words, SQL Server has no idea what state you want a particular property of a facet to have, so you must specify this state. For example, if you want the AutoClose property of the Database Options facet set to "false," you must create a condition that specifies this.
- On Demand: This means that you will evaluate your policies whenever you want.
- On Schedule: This means that your policies will be evaluated on a predefined schedule you create.
- On Change Prevent: This means that if someone makes a change that will cause a policy to evaluate to false, that you want to prevent this action from being taken. This option is only available on activities that can be rolled back.
- On Change Log Only: This is like On Change Prevent, but instead of preventing the action, it allows the action, but logs the fact that the out-of-policy action occurred.
To summarize, when you create a policy, you are specifying a combination of a condition, target, and evaluation mode, all in the same step.
- Creating and evaluating Policies: Now that you have created a condition that specifies the state you want a facet's property to have, you now create an actual policy. In this context, a policy is used to specify the condition you just created, the targets that are to be evaluated with the condition, and its evaluation mode. A target can be a SQL Server instance, database, or database object. Evaluation mode refers to how you want the policy to be evaluated. By evaluated, this means that the condition you specify is compared to the actual setting of the target you specify. If your condition matches the actual setting of the target, the policy evaluates to be true, which is your goal. If your condition does not match the actual setting of the target, the policy evaluates to false, which means that your policy is not in compliance with the condition you have established. There are four options for evaluation mode:
- Executing the Policy: The last step is to actually execute a policy and see the results. If the evaluation mode of the policy was On Demand, then when you run the policy, you get a report back on what targets met or failed the policy. If the evaluation mode was On Schedule, then this evaluation occurs at a predetermined schedule. If the evaluation mode was On Change Prevent, then whenever someone does some action that does not match the policy's condition, then the action is prevented. If the evaluation mode is On Change Log Only, then if someone does some action that doesn't match policy, then the action is permitted, but the fact that it was out of compliance is logged in the event log.
This is a lot of material to absorb. To make it easier, let's look at how we implement all four of these steps in a simple example.
How to Implement a Simple Policy
Policy-Based Management is generally implemented using SQL Server Management Studio (SSMS), although, if you prefer a more automated or programmatic approach, it can also be implemented using PowerShell scripts. We will use SSMS to implement our example policy.
For our example, consider that you, as the DBA, want to create a simple policy that specifies that all the SQL Server instances in your organization should have their server authentication method set to Windows Authentication mode. On the other hand, while you want this policy enforced, you also realize that there might need to be some exceptions. For example, not all SQL Server-based applications use Windows Authentication and some require SQL Server authentication instead.
Creating and implementing a policy is a four step process, as described previously, and each step is outlined in the following sections.
Step 1: Selecting Facets
As I mentioned earlier, Policy-Based Management allows the DBA to create policies on 74 different facets of SQL Server, and each facet has one or more properties. In fact, there are hundreds of properties, and when you first begin creating your own policies, one of the difficulties you will have is figuring out which property(s) of which facet(s) describes the feature of SQL Server on which you want to create a policy. Perhaps the easiest way to get started is to open up the Facets folder under Policy Management, and scroll through them, as you see in figure 2 below.
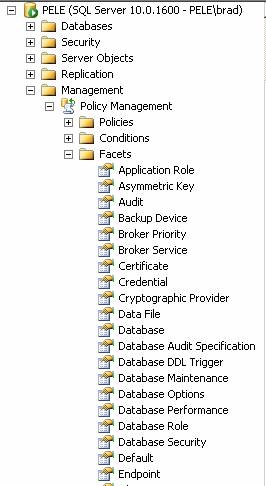
Figure 2: Above are some of the 74 facets available in SQL Server 2008.
Once you find a facet that seems to describe what you are looking for, right-click on it and select "Properties". This will list all of the properties, and hopefully you will find what you are looking for right away. If not, you may have to keep on trying until you find the correct facet and property that meets your needs.
For our example, we will be using the Server Security facet, which has nine different properties (see figure 3 below), one of which is LoginMode, which is used to describe the authentication mode used by SQL Server.
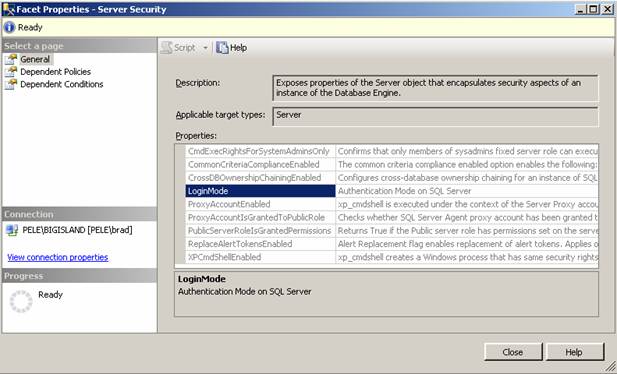
Figure 3: Each of the 74 built-in SQL Server facets has multiple properties you can create policies on.
Once you have identified the facet and property you want to create a policy on, the next step is to create the property condition.
Step 2: Setting the required Property Conditions
Once a facet (and its property) has been selected as the basis for a policy, the next step is to define a logical condition that specifies the desired state of the selected property. The LoginMode property has four different states: Normal, Integrated, Mixed, and Unknown (all of the available states are listed for us in the "Create New Condition" dialog box, so all we have to do is to select the one we want to use). These states of the LoginMode property determine which authentication mode a particular SQL Server instance might have. In our case, we want our policy to enforce Windows authentication, so the LoginMode property should have a state of Integrated.
To create this condition, right-click on the "Server Security" facet and select "New Condition". The "Create New Condition" dialog box appears, as shown in Figure 4:
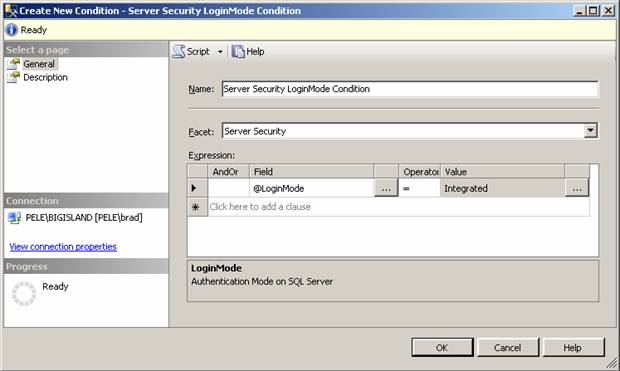
Figure 4: After selecting the correct facet, the next step is to create a logical condition defining what we want to test for.
Creating a condition involves several steps. First, we have to give the condition a name. In this case, I have used the name "Server Security LoginMode Condition".
Next, from the "Field" column for our expression, we need to select @LoginMode, which is the property of the Server Security facet we want to test for. This property is available from a drop-down box under "Field," as are all of the properties for this facet.
Now we must select an operator, which is used to test our condition. In this case, we select the "=" operator because we want the @LoginMode Field to equal a value that represents integrated security. The drop-down box, that includes the "=" sign, includes seven additional operators you can choose when creating a condition.
The last step is to select the state we want to test for. Here, we select the Integrated state of the @LoginMode because this is what we are testing for. What, in effect, we are doing here is creating an expression like this:
@LoginMode = Integrated
By clicking on the OK button, this condition is saved. Next, when we create the actual policy, it will use this condition to evaluate if the @LoginMode state of a particular SQL Server instance is Integrated or not. A return value of "true" indicates that the server is configured to use Windows Authentication. If the condition returns a "false," then we know that the SQL Server instance is not using Windows Authentication.
Step 3: Creating the Policy
Once the condition for the facet has been created, our next step is to create the policy. To do this, we again right-click on the "Server Security" facet, but this time we select "New Policy". The dialog box shown in Figure 5 appears.
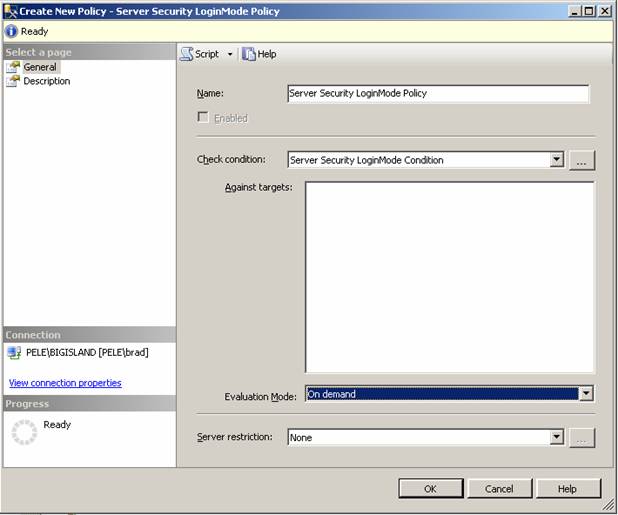
Figure 5: Creating a new policy is simply a matter of selecting the appropriate options.
At first, this screen might seem likes it involves a lot of work, but it is actually very straight-forward. The first step is to give the policy a name. In this example, the name is "Server Security LoginMode Policy".
The next step is the most important. Next to "Check Condition" we select the condition we created in the previous step. It will be available from the drop-down box, so you don't have to remember how to type it in.
The Against Targets option on this screen is not active because the facet and property we selected is at the instance level. If the facet and property were at the database or object level, then we would be able to select from the appropriate database or objects here.
The next step is to select which type of Evaluation Mode we want to use for this policy. The available options for this particular facet include "On Demand" or "On Schedule." While Policy-Based Management offers four different ways to evaluate a policy (mentioned earlier), only two are available for this particular facet and property. The available Evaluation Modes depend on the particular facet and property you are working with. For this example, we are going to choose "On Demand."
We have one last step, and that is to set the "Server Restriction" option. The default choice is "None", which means that the policy can be run against any SQL Server instance. Alternatively, it can be set such that the policy is only run on specific SQL Server instances. For this particular policy, it makes sense to allow it to be run on all servers, so we accept the default option. Once we are done, we click OK, and the policy is saved.
Step 4: Running the Policy
We are now done creating our policy, and the only thing left to do is to run it on demand to see if a particular SQL Server instance is in or out of compliance with the policy. There are several different ways to run a policy on demand. In our example, we will run this policy on demand by going to the specific policy, right-clicking on it, and then choosing "Evaluate", as shown in Figure 6 This runs the policy on demand on the local SQL Server instance and returns the results, letting us know whether or not this particular instance is in compliance with our policy.
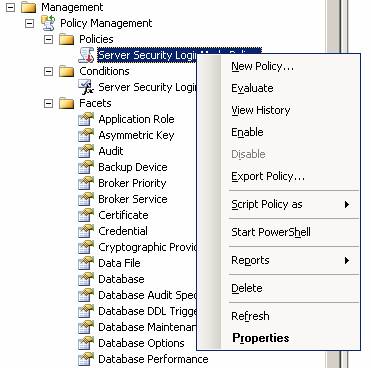
Figure 6: One way to run a policy on demand is to "Evaluate" it.
After clicking "Evaluate", the "Evaluate Policies" dialog box appears, as shown in Figure 7:
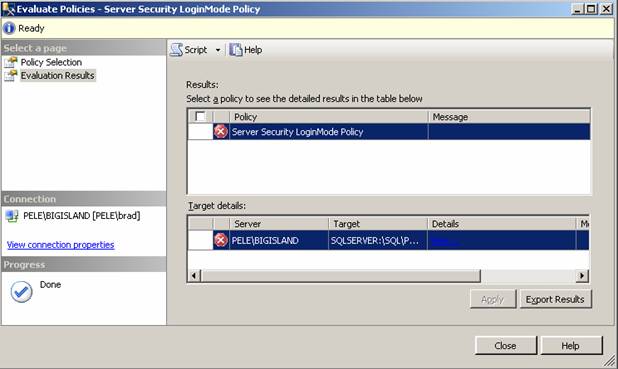
Figure 7: The policy has be run on demand, evaluated, and now we see a red icon, which indicates that the server we just evaluated for this policy failed the evaluation.
The top part of the box shows us what policy was evaluated. In this case, only one policy was evaluated, and it was the "Server Security LoginMode Policy" we previously created. Note that there is a red icon next to it. This indicates that one or more targets (in our case, a target is a SQL Server instance) is out of compliance with the policy (compliance is indicated by a green icon).
To find out why, we can click on the "View" link under "Details." Note, the color scheme used makes this difficult to see in figure 7. When you click on "View," the screen shown Figure 8 appears:

Figure 8: When we view the details of the policy's results, we can find out why the policy shows that the server that was evaluated was not in compliance with the policy.
The "Results Detailed View" screen shows us what was tested. The @LoginMode property of the Server Security facet is supposed to be equal to "Integrated," but that it wasn't, as the actual value was "Mixed."
Now that we know that our SQL Server instance is out of compliance with our policy, what do we do? As the DBA, we have to decide if it is critical that this instance be in compliance or not. If it should be in compliance, then we can make the necessary change and bring it into compliance, or we can decide that this instance is an exception and should remain out of compliance.
You might be asking, can't I press a button and have the non-compliant server made compliant with the policy? Not in this case. Only some facets and properties can be automatically brought into compliance with a policy. Our example is one of the cases where this option is not available.
That's it, we are now done. We have created a policy, we ran it against a SQL Server instance, and now we know that our server is out of compliance. At this point, we have only evaluated a single server to see if it is in compliance with our policy. If we have more than one server, how do we check for compliance?
Checking Multiple Servers for Compliance
Checking multiple servers for compliance with a policy involves several additional steps, which we will describe briefly here
- Create, deploy, and test a policy on a designated instance of SQL Server, just as we did above.
- Export the policy from the instance as an XML file by right-clicking on the Policy and selecting "Export Policy".
- Using SSMS, create a local server group, or a central management server group, that includes all the SQL Server instances on which you want to apply the policy. For this example, there are only two SQL Server instances in our server group.
- Right-click on the server group, and then select "Evaluate Policies." This causes the "Evaluate Policies" dialog box to appear, as seen in figure 9. The next step is to import the XML policy file that you exported in step 2 above. You do this by clicking on the "Browse" button next to "Source", pointing to the XML file, and then opening it.
Figure 9: Use the above dialog box to select the XML file of the policy you want to evaluate.
Once the XML policy file has been loaded, click on the "Evaluate" button, and then the results are immediately displayed in the "Evaluate Policies" dialog box, as show in Figure 10:
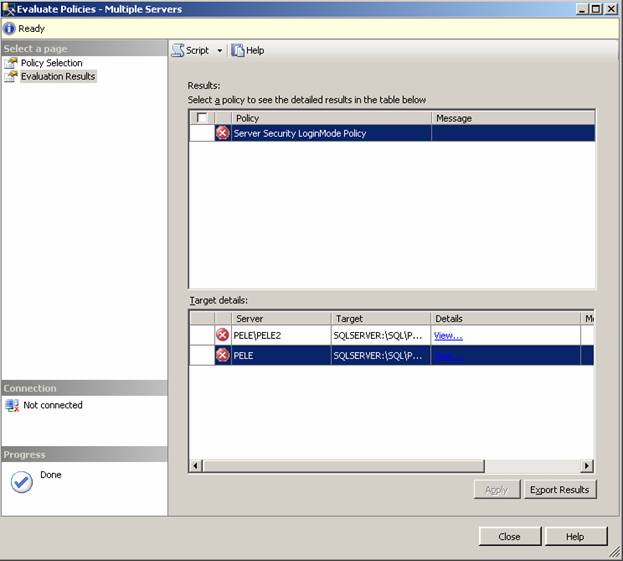
Figure 10: The "Evaluate Policies" dialog box looks like the one we saw in the previous example, except that now it shows the results of two servers.
In this example, we evaluated only one policy, and both of the servers in our server group are out of compliance with that policy. As you can quite well imagine, if our server group had 100 servers in it, this would indeed be quite a powerful demonstration of how Policy-Based Management can be used by a DBA to quickly determine if the servers he controls are in or out of compliance with the organization's policies.